A simulated ESP32 in Velxio has always had working WiFi — it joins a built-in network, gets an IP, and reaches the internet, running the real WiFi stack. The one thing you could not do was tell it which network to join. Today you can: with a Maker plan, you drop a WiFi Access Point part on the canvas and the emulated radio broadcasts your SSID.

Your SSID, your channel, your rules
The part is the first in the catalogue with no pins — it is not an electrical component, it is airspace. Give it a name, a channel and a signal strength, and your sketch connects to the network it actually names:
WiFi.begin("HomeNet", ""); // the SSID on your Access Point part
No rewriting, no demo networks. The SSID you type is the SSID that exists. And because the canvas defines the airspace, a scan sees exactly what you put there — add several access points to build and test a network-selection UI, each with its own channel and strength, and the scan even jitters a few dB between passes the way a real one does.
Two switches are worth knowing:
- Internet — turn it off and the network goes isolated: the board associates and gets a DHCP lease, but nothing routes out. That is the provisioning / captive-portal scenario, testable in the simulator for the first time.
- Password — stored with the part and shown on its card. Sketches that pass a password connect fine.
As soon as your project has one access point part, the built-in demo networks go quiet — the canvas is the whole spectrum now.
The WiFi panel, and a real packet capture
The WiFi icon in the toolbar is now a split button. The icon itself keeps its one-click action — with an IP it opens the board’s web server. The little caret next to it opens the new WiFi panel:
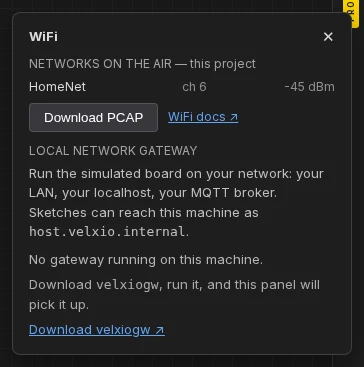
It shows the networks currently on the air, which one the board joined and its
IP, and — the part every embedded developer will reach for — Download PCAP.
That hands you the run’s 802.11 traffic as a capture file that Wireshark opens
directly: the association handshake, DHCP, DNS, the TCP your sketch made, with
simulated-time stamps. Nothing is uploaded; the file is produced in your
browser. The next time a connection “just doesn’t work,” you can see exactly
where it stopped instead of guessing from Serial.println.
Reach your own network
The simulated board reaches the internet through Velxio’s cloud gateway by
default — but not your local network. The new local network gateway removes
that limit: a small program you run on your own machine
(velxiogw, source public, binaries free),
paired from the WiFi panel with a one-time code. From the next Run on, the
board’s traffic egresses from your machine — your MQTT broker, your Home
Assistant, the API you are developing on localhost, all reachable from the
sketch, and the machine itself addressable as host.velxio.internal.
On the Velxio Desktop app you do not even need that: the simulation already runs on your machine, so the board is on your network by construction.
Try it
Open the Connect to your own WiFi network example — it comes with the access point already placed — or search “WiFi Access Point” in the part picker. Full details are in the ESP32 WiFi guide and the local gateway walkthrough.
Custom access points and the local gateway are Maker-plan features; the WiFi panel and the PCAP export are free for everyone.